Pages

Get our free set of "Dave Hill" Photoshop actions...

Senin, 30 Juni 2014


Last week we gave away our free tilt-shift action (it's still free, just follow that link), this week it's our free "Dave Hill" look action.

One of our long time readers actually created two "Dave Hill" Photoshop actions to share with everyone here on Weekly Photo Tips.

The first action is simply a "one click" and the action is applied, the second action stops at each stage of the effect allowing you to "tweak" it to your personal taste.

If you would like this set of actions along with the instructions on how to install them into Photoshop simply drop us an email and we'll get them out to you.

Click on the images to view larger.


Photography just for the fun of taking pictures...

Selasa, 24 Juni 2014


Sometimes taking pictures is just about the fun of it, the joy of capturing the image.

This past weekend I had the pleasure of photographing a 5K color run, aka "the Happiest 5k on the planet", in South Portland (Maine).

We had outstanding weather, it was fun event and it was for great cause. If you are looking for a fun photography project check their website to find a color run near you.

My only suggestion would be to get some protection for your camera (like a rain sleeve for under $10 here or here) as the color is mixed in a fine cornstarch and the dust is EVERYWHERE (seriously, everywhere), so protect your gear.

Here are a few images from the day, click on any of them to view larger.


Photography gear deals of the week...

Kamis, 19 Juni 2014


Here are a few deals on some very good photo gear at great prices that may be of interest, AND they all come with free shipping.

RadioPopper JrX Studio Kit with Transmitter and Receiver - $199 


Giottos Vitruvian Aluminum Tripod & Monopod combo with QR Ballhead - $199


Glow HexaPop 20" for portable off camera flash - R Series - $99


Westcott Photo Basics 40" 5-in-1 Collapsible Reflector, 2 Pack - $49


Now this last item might not be photography related (though they could be used for monitoring sound for video), but I own these headphones and they are freaking amazing and so is the price! Seriously, I own Bose headphones as well and these are far better, hands down.

Able Planet Noise Canceling Over-The-Ear Headphones - $49.99 (originaly $149.00)


Free "tilt-shift look" resource #3, our step-by-step Photoshop tutorial!...

Rabu, 18 Juni 2014


This is the last in our series of "Tilt-Shift Resources":

1.A DIY tilt-shift lens mount for Nikon cameras

2.Free tilt-shift lens look resource #1 - TiltShiftMaker.com
 
3.Free "tilt-shift look" resource #2, get our FREE Photoshop action!

And we are going to wrap up the series with a "faux" tilt shift lens tutorial, so here goes.

This is a quick and easy tutorial on creating the "tilt-shift look" in Photoshop.

Just one thing before we jump into the tutorial, the best shots for these are wide(r) angle shots from above.

And of course the image I am using for the tutorial is neither.

This was an image I took during the "Occupy" protests and I really wanted the focus to be on the young lady and her sign.


Here we go:

1. Open up your image in Photoshop

2. The first thing is to duplicate your image by either dragging it to the "create a new layer" icon, or keyboard command Ctrl + J on a PC or CMD + J on a MAC


3. Then go to "Filters", "Blur", "Gaussian Blur" and set the Radius to (roughly) 10


4. Add a mask to the layer that you created (and blurred)


5. Set you foreground color to white and background color to black


6. With the mask you just created in step 5 selected, use the Marquee tool to select the area that you will want to be in focus


7. Fill that selected area with black (PC - Ctrl + Back-Space, Mac - CMD + Delete)

8. Then deselect (PC - Ctrl + D, Mac - CMD + D)

9. Keeping the mask selected you will then go to the "Masks" tab and adjust the feathering to make it a bit smoother (around 70)


10. Select your curves layer to add contrast by creating an "S" curve


11. Then back to the adjustments tab and select "Vibrance" and adjust to taste


And the finished product.


Keep in mind the numbers I used are not necessarily the ones that will work for you, but they are a good starting point. I would love to see what you come up with.

Free "tilt-shift look" resource #2, get our FREE Photoshop action!...

Rabu, 18 Juni 2014


Here is #2 in what will be a 3 part posting of free "tilt-shift look" resources.

Resource #2 is a free "Photoshop Tilt-Shift Action", yup, we said FREE and we are offering it to everyone of our readers

All you need to do to get your free Photoshop action is drop us an email and request the tilt shift action, and next week (after we have received all of your requests) we will be sending out the action (with instructions) to everyone who requested it.

Here are before and after images that demonstrate our tilt-shift action.


Click on any of these images to view them larger.


Pretty cool, huh?

So go ahead and drop us an email and we will be sure to add you to our tilt shift mailing group.

Free tilt-shift lens look resource #1...

Rabu, 18 Juni 2014


As many of you know, we are BIG fans of the look that comes from using a tilt-shift lens, but alas most of us cannot afford one of those bad boys so we are always on the lookout for an alternative way of achieving "the look".

Well TiltShiftMaker.com has made achieving that look even easier.

You upload your photo, you select the area you want in focus, and you are done!

Another option available at TiltShiftMaker.com is to simply point to an image already on the web and create your tilt-shift image from there.

Below are a few samples from their gallery, and if you follow this link it will take you to 50 beautiful examples of tilt-shift photography.

Click on any of these images to view them larger.


Call for contributors to Weekly Photo Tips!...

Senin, 16 Juni 2014


Would you like to write a guest blog post for Weekly Photo Tips?

Well, it just so happens we are currently looking for contributors, so if you have a tip, a trick, a technique, a tutorial, or (almost) any photography related idea you would like to share with our readers we would love to know about it.

Any post that is chosen to appear here on Weekly Photo Tips will do so under your name with your bio and link(s) back to your website, blog, or other web presence.

So  please, send us an email with your idea and we promise to get right back to you.


Photographing shiny, reflective objects, quick & easy...

Kamis, 12 Juni 2014


We recently traveled to Connecticut to shoot shiny and reflective components for the world leader in CAD/CAM software MasterCAM .

Not only is MasterCAM a world leader, they work with some of the top companies out there, like:

• Boeing, Sikorsky, and Lockheed Martin
• Stryker medical
• Gibson, Taylor, Ovation Guitars
• Orange County Choppers
• Racing teams like Stewart Haas Racing, Waltrip Racing, and Cunningham Motorsports
• Segway
• RayBan

Just to name a few.

The actual purpose of the trip was to teach their person (with the title of "Intergalactic Marketing Overlord") how to shoot the kind of components their software (and clients) produce and of course regardless of the company, they are ALL shiny and reflective. The backup plan was that if things did not go well then I would shoot the parts.

Things went perfectly and the setup could not have been simpler, 4 "A" clamps, 3 white cards, 2 LED flashlights, foam core, some tape, light stands, and a couple gels.

We used hockey tape because it is FAR less expensive the gaffers tape, but much like gaffers tape it is incredibly strong and leaves no sticky residue behind.

A 1” wide role of gaffer’s tapes is in the $12 range, I bought the same size hockey tape for $1.

I would strongly suggest you test the tape you purchase before using it in a “live” shoot just to make sure it will work as you expect and not leave residue.

The "A" clamps were 99 cents (Home Depot or Lowes) and the 2'x3' sheet of foam core was $1.

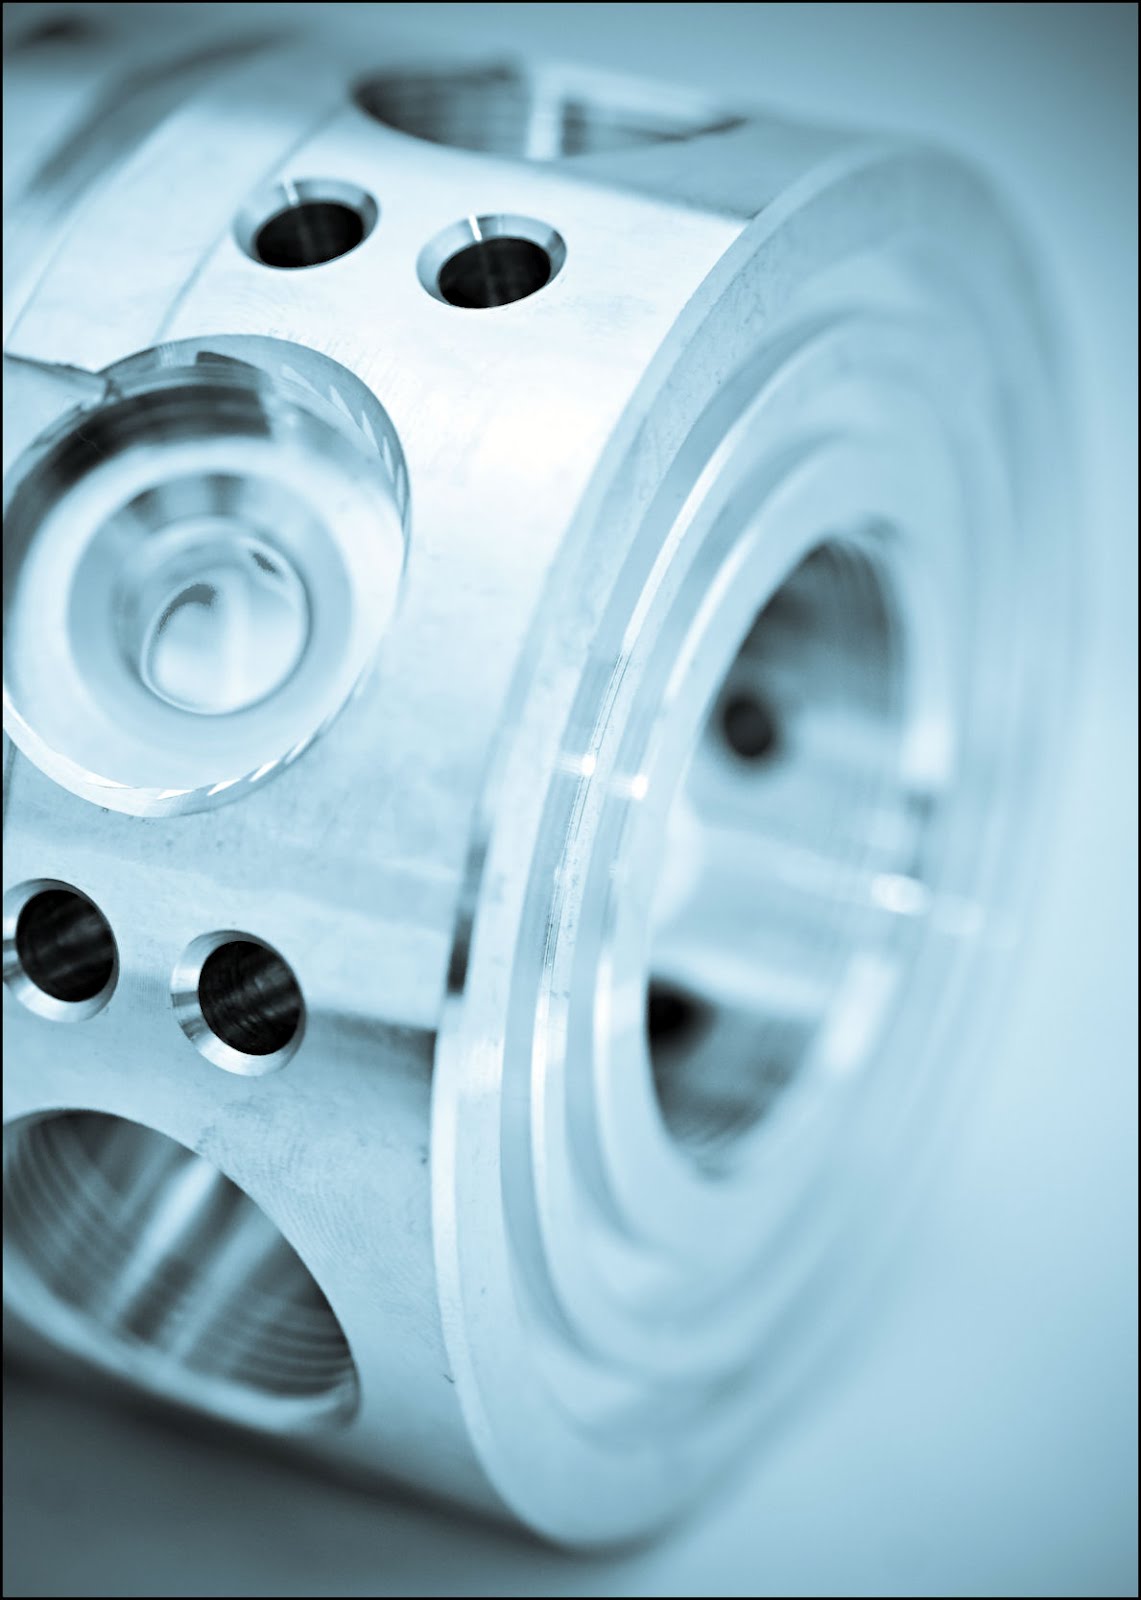
In the shot at the very top of this post, we lit it with a single LED flashlight, and put a blue gel over a second flashlight and shined it into the center hole (to give it more "depth")

One of the things you need to be very careful to watch for is things being reflected in the item being shot, here is an example, first the "good shot" and then the bad, you can see the color of my shirt in the item.

It was lit with a "primary" flashlight and a second with a blue gel.


This image is the only one that we used more than two flashlights, it is a manifold for a car engine, there is a (cold) gas intake and a (hot) exhaust port, so we used a red and blue gels over the flashlights and held them over the ports to represent the temperature difference and the third flashlight was used to light the face of the object.


Here are a few more images we shot that day.


(click on any image to view larger and in a new window)


I think the results were as good as the setup was easy and in the video below we share both the gear and the setup.

If the video did not come through with your subscription email you can head back to the blog or directly over to our YouTube channel to view it.


More Lightroom resources for you, this time it's free Lightroom training...

Selasa, 10 Juni 2014


This is to "compliment" our Lightroom posts from last week, the first being where to download your "Free Lightroom Quick Start Guide" and the other was the bazzilion "Free Lightroom Presets" post.

If you are looking for Lightroom video training, this is the list for you:


1. Let's start with Anthony Morganti, he has put together an amazing 38 video series on using Lightroom


2. Shutha is a free online training resource and one of their courses is an extremely comprehensive exploration of Adobe Photoshop Lightroom taught by Lightroom expert Peter Krogh


3. Then there is 100 Ways Adobe Lightroom Kicks Adobe Bridge's A$$ for Photographers! from Scott Kelby


4. No list would be complete without having the long running Lightroom Killer Tips from Matt Kloskowski


5. B&H Photo has a 4 video series "Digital Photography Summit" filled with almost 4 hours of Lightroom training

This is proof you can get really good stuff for free.


Welcome to our first Flickr Friday...

Jumat, 06 Juni 2014


For our first ever Flickr Friday please enjoy the images of Maryann.

Please stop by our Flickr Group to see other great images from Maryann and our other members as well.

If you would like to join our Flickr Group just follow this link for instructions.


Get your free Lightroom 5 quick start guide...

Kamis, 05 Juni 2014


Lightroom expert Victoria Bampton aka "The Lightroom Queen" has put together an outstanding (and FREE)  Lightroom PDF "Lightroom 5 Quick Start Guide".

It's 78 pages and packed with useful information from front to back, so follow this link to get your copy.

But wait, there's more!

Victoria also has a bunch of other great FREE resources as well, including Lightroom Plug-ins, Lightroom Keyboard shortcuts, and downloadable watermarks.

While we're talking about Lightroom, here are a couple more resources you will want to use.

From Adobe here is their Lightroom 5 getting started and a complete list of their Lightroom 5 tutorials.


More FREE Lightroom presets than you can count!...

Selasa, 03 Juni 2014


Updated and Expanded!


Today's post is an updated and expanded version of one of our most popular posts EVER, all you'll find here today are free Adobe Lightroom presets, but contrary to what the title of the post says, you most likely would be able to count how many presets are listed here, which likely approaches one thousand.

This post goes well with our post on Lightroom educational resources from last week, so once you finished all the tutorials you can get to work using some of these free presets.

There's a lot, so lets get at it:

1. From f/stop spot - Free Lightroom Workflow Presets for Portrait Photographers

2.Here are free Lightroom presets from Adobe

3. Fine art photographer Andrew S. Gibson - Using Lightroom Presets for Portraits

4. Presets Heaven - TOP 5 most downloaded Lightroom Presets

5. Nicole S. Young (one of my favorite people) - Free Lightroom Presets

6.  Matt Kloskowski (another of my favorites) - Lightroom Presets – Wedding Fairytale Glow

7. Matt Kloskowski II - You'll find all of his free presets here

8. You have just one guess at what you'll find at FreePresets.com

9. Tonja Petrella has put together an extensive list of free and almost free presets on Pinterest

10.Free Lightroom Presets for weddings from Dror Eyal

11.Here's a list of presets, tutorials, and more from Digital Photo Buzz

12. Gavin Seim - The Ultimate Free Presets List (pretty darn extensive)

13.A big pack of free Lightroom presets from William

14. Lightroom Presets from onOne Software

15. photo tut+ - 100 Free Lightroom Presets (And How to Make Your Own)

16. 14 free presets from Wonderland Adobe Lightroom Presets

17.  Inside Lightroom - Black & White presets (be sure to click on all the categories under "Lightroom Presets" so see all of the free presets available)

18.Another Pinterest list of Free Lightroom Presets from Genevieve Winters

19. Check out Presetting Lightroom's 180+ Free Presets Collection

20. PresetPond has many, MANY presets and I like that you can mouse over the image to see the preset "in action"

21. Cole's Classroom brings you "15 Must Have Lightroom Presets!"

22. Be sure to check out Anthony Morganti's "More Free Lightroom Presets"

23. Here you will find "230 Free Lightroom Presets You Will Love"

24. If you like black & white head over to FlixelPix for their free lightroom presets

25. coincidentally, at #25 is 25 Excellent Free Adobe Lightroom Presets

26. Katherine M. has assembled a very nice collection of presets on her Pinterest board

Please feel free to share this post with all your Lightroom using friends!

If you know of free presets that are not listed here let us know by dropping us an email and we will be sure to update our list.


A new Weekly Photo Tips feature - "Flickr Friday"...

Senin, 02 Juni 2014


Beginning this Friday (6/6/14) we will be starting a new feature Weekly Photo Tips called, "Flickr Friday".

Each Friday we will pick images from our Flickr group for you (and the world) to see.

So if you are already a member of our Flickr group please upload your images, if you are not yet a member but would like to be, here's how:

The first thing you will do is follow this link to our Flickr page. Once there, in the upper left page heading you will see a "+ Join Group" box that you will click on to join our group (see the screen shot below). To join the group you will need a Flickr account, if you don't have a Flickr account you will need to create one.


Once your request to join our group is approved (which will usually only take a few hours) you can return to our Flickr page and submit all images you would like.

As a member, when you return to our Flickr page you will find the "+ Add Photos" box in the exact same place that the "+ Join Group" was. (see the screenshot below).

The only thing we ask is that any images you upload to our group be "family friendly".

For easier viewing simply click on an image to view it larger and in a new window.

I hope that helps, if you still have questions do not hesitate to contact us and we will do what we can to get you up and running.


Page 1 of 55123...55
 

Most Reading

Sidebar One